I would like to take this opportunity to wish everyone a very Happy New Year and thank all of you who have made 2011 one to remember. There have been many ups and downs this year but my quilting family have been there to encourage and console. Thank you for looking out for me, I could not have made it without all of you.
Looking forward to 2012 there are many new things coming my way. I have a full teaching schedule coming up this winter season. I also have some special projects I have been working on and will share with all of you as they are completed.
I have a new website in the making and I am very excited on how it is going......you can check on my progress and hopefully in the next two weeks it will be all up and running. www.cherrytreequilts.ca
One on the things I am most excited about is that I have become a Canadian distributor for the best thread on the market. Fil-tec Threads. The Glide thread is just amazing and when you pair it with the pre-wound bobbins you get the best tension you could ever have. More to follow on this.........
Again I would like to wish you all a Happy New Year!! May your year be filled with much joy, happiness and prosperity.
Barb

Cherry Tree Quilts - Quilts and More
Saturday, December 31, 2011
Monday, December 5, 2011
Mystery Quilt Mondays - Clue #3
Good morning to all you Mystery Quilters out there. Here is clue #3 that you all have been waiting for.
Today it's all about Flying Geese. I really like using the Quilt in a Day - Flying Geese Ruler but for this quilt the size of the unit unfortunately did not correspond to the ruler....so we are going to have to use the old fashion way of making Flying Geese.
Place the next 3" square on the opposite side of the 5 ½” x 3” rectangle - lining up all the edges. Sew on the line. Again - I like to sew from the outside corner into the middle. This way when you come to the previous seam you are traveling in the right direction and you won't have your previous seam turning in the wrong direction and your unit will lay flat. Lay your ruler's ¼” line onto your sew line. Trim away the excess. Press Fabric #4 away to the outside corner as shown in Fig. 5 & 6.
You will make 48 units of Flying Geese (Fig. 6) measuring 5 ½” x 3”
Today it's all about Flying Geese. I really like using the Quilt in a Day - Flying Geese Ruler but for this quilt the size of the unit unfortunately did not correspond to the ruler....so we are going to have to use the old fashion way of making Flying Geese.
Unit 4 - Make 48 Flying Geese units using Fabric #2 and Fabric #4.
You will need to cut the following:
48 - 5 ½” x 3” rectangles from Fabric #2
96 - 3" x 3" squares from Fabric #4
To make the flying geese units you will draw a line (on the wrong side of the fabric) corner to corner on the 3" squares (Fabric #4) - this is your sew line (Fig. 1).
 |
| Fig. 1 |
Place the square on one side of the 5 ½” x 3” rectangle - lining up all the edges. Sew on the line. I like to sew on the line from the outside corner down to the middle of the 5 ½” x 3” rectangle. Sewing this way helps when you want to do a strip sewing method (continuous sewing of all the units).
 |
| Fig. 2 |
Lay your ruler's ¼” line onto your sew line. Trim away the excess. Press Fabric #4 away to the outside corner as shown in Fig. 4
 |
Fig. 3 |
 |
| Fig. 5 |
 |
| Fig. 6 |
Friday, December 2, 2011
UFO Friday!!
I know that I have been missing in action with my UFO Fridays.....but I have been holed up in my studio. I can't complain....I just love it! It's a nice working space with a cosy fire and a warm latte....very inspiring and comforting. It has been a very busy few weeks though, quilting and preparing for new classes in the New Year. Here is a sneak peek at some of my upcoming classes.
 |
| Fiber Layering
Here are just some of my samples for my series called Fibre Art. The first in the series is Surface Design I running in January at Linda's Quilt Shoppe in Kelowna.
   |
Monday, November 28, 2011
Good Monday Morning!!
Well....this is what I woke up to this morning......can't beat it. What a glorious morning, however, all I can think about is all those projects waiting to be completed. There are the UFO's and more UFO's just brimming out of my "To Do" box. There are classes to prepare for coming up in January, those customer quilts and of course getting ready for Christmas. So today is 'List' day.....yes the dreaded list. When you have to make one you know you have way too much on your plate. So I think I will take advantage of this glorious morning and go for a walk....clear the cobwebs...sharpen the pencil....make that list....then get at what I love best....quilting!!!


Monday, November 7, 2011
Mystery Quilt Mondays - Clue #2
Hello to all you mystery quilters out there. It's the first Monday of the month. I have been busy working on the quilt and here is Clue #2.
I am going to refer to my fabrics by number and each part of the quilt by unit. That way when we get to the point of putting the quilt together you will have an easier time of it.
Again - here are the fabric requirements and my fabric choices. I have laid them out in numerical sequence from left to right. (I must confess that my fabric #2 had to be changed. I pulled a fabric from my stash but I did not quite have enough yardage. I think it worked out for the best as my second choice is much nicer.) I would suggest that you take a small swatch of each fabric and make yourself a chart by gluing them next to the numbers listed below.
1) 1.25 m of your focus fabric
2) 2 m light fabric
3) .5 m dark fabric
4) .75 m medium fabric
5) .5 m medium to dark fabric
6) .5 m medium to dark fabric
7) .75 m medium fabric
8) .75 m dark fabric

Also as we complete each unit I would suggest putting them in baggies and marking the unit number on each bag.
It's all about four patches. I like to strip piece my quilts as much as possible. I find I save time and it adds a bit more accuracy.
Unit 1 - make 12 four patch blocks using Fabrics #5 and #6. Each square in the four patch is 1 ¾” square.
Cut from each of Fabrics #5 & 6 – 1 WOF (width of fabric) strip measuring 1 ¾” wide by approx 40”
Sew the two strips together, press to one side (Fig 1
Sub cut the strip into 24 pieces at 1 ¾” wide (Fig 2)
Sew two units together to create a four patch block measuring 3” unfinished (Fig 3).
 |
| Fig 1 |
 |
| Fig 2 |
 |
| Fig 3 |
Cut from each of Fabric #2 and #5 – 3 WOF strips measuring 1 ¾” wide each
Sew one Fabric #2 strip to one Fabric #5 strip to create a strip piece unit (Fig 1). Repeat for the other strips. Press to the dark fabric.
Sub cut into 48 pieces that are 1 ¾” wide (Fig 2).
Sew two units together to create a four patch block measuring 3” unfinished (Fig 3).
Unit 3 - make 24 four patch blocks using Fabrics #2 and #6
Cut from each of Fabric #2 and #6 – 3 WOF strips measuring 1 ¾” wide each
Sew one Fabric #2 strip to one Fabric #6 strip to create a strip piece unit (Fig 1). Repeat for the other strips. Press to the dark fabric.
Sub cut into 48 pieces that are 1 ¾” wide (Fig 2).
Sew two units together to create a four patch block measuring 3” unfinished (Fig 3).


The next clue will be posted the first Monday - December 5th.
Happy Piecing!!
Thursday, October 20, 2011
UFO Friday!!
I did miss last Friday's post but I have a very good reason. I was down in Portland Oregon for the week taking in MQX - Machine Quilters Expo. It was a great time - meeting new people, enjoying the vendors (always in need of new thread!!) and admiring the beautiful quilts.
I was actually creating new UFO's to add to my list. Here are some of the projects I started and hope to finish soon.
I took a Painted Faces course with Bonnie McCaffrey (check out her website - http://www.bonniemccaffery.com/ ). It was a long day but the results were worth it. Lots of fun and I am already planning my next Painted Faces Quilt - although I should finish the first one.

Another great class I took was Sharon Schambers Piec-lique' Class and we made the French Country block. I used my hand dyed fabrics and I am really thrilled with the results. All that's needed is a little quilting and binding and it's done. I hope to finish this in the next week. I love taking classes with Sharon. She is a lovely lady and it's always fun just taking a class where you can just relax and do a bit of sewing. Here is her website: http://www.sharonschamber.com/

The third class that I really enjoyed was Claudia Pfeil's longarm class where we did some really nice background fills and then couched with the longarm along the divisions with some Razzle Dazzle thread and a bit of yarn around the edges. I just finished the quilting and couching today and have the binding left to do. Here is Claudia's website: http://www.claudiapfeil.de/ Check out her award winning quilts. They are very impressive.

I was also really inspired by Norma Riehm. She does some great work layering fabrics, yarns, threads, flowers and creates some beautiful fabrics which she uses for art quilts, hand bags and clothing. I am off to the yarn store tomorrow to build up my stash as I can't wait to try her methods of creating fabric. So beautiful. Here is her web address: http://www.quiltingisafineart.blogspot.com/
I was actually creating new UFO's to add to my list. Here are some of the projects I started and hope to finish soon.
I took a Painted Faces course with Bonnie McCaffrey (check out her website - http://www.bonniemccaffery.com/ ). It was a long day but the results were worth it. Lots of fun and I am already planning my next Painted Faces Quilt - although I should finish the first one.


The third class that I really enjoyed was Claudia Pfeil's longarm class where we did some really nice background fills and then couched with the longarm along the divisions with some Razzle Dazzle thread and a bit of yarn around the edges. I just finished the quilting and couching today and have the binding left to do. Here is Claudia's website: http://www.claudiapfeil.de/ Check out her award winning quilts. They are very impressive.

Monday, October 10, 2011
Mystery Quilt Mondays
Welcome to the Mystery Quilt Mondays.
Over the next several months I will be posting the first Monday of the month, clues on a mystery quilt. With each successive clue your quilt will grow. It will be a load of fun.
There are eight fabrics involved in this lap size quilt and the fabrics will be numbered. I would suggest once you get your fabrics that you take a small snippet and tape it to these instructions. It will help keep you on track over the next few clues.
Focus Fabric – this is your main fabric. The one that ties your quilt colours together.
1) 1.25 m of your focus fabric
2) 2 m light fabric
3) .5 m dark fabric
4) .75 m medium fabric
5) .5 m medium to dark fabric
6) .5 m medium to dark fabric
7) .75 m medium fabric
8) .75 m dark fabric
Here are my Mystery Quilt Fabrics - numbers 1 through 8 are left to right. Double click the picture to see it in a larger format.
I hope you will join me on this Mystery Adventure!!
Friday, October 7, 2011
UFO Friday!!
I hope you are working on your UFO's. Here is my latest project that I finished this morning. I made a couple of placemats for my Auntie Dot and Uncle Jan. They travel during the winter in their motor home and I thought they should have a little reminder of home. There are lots and lots of quail here in the Okanagan Valley and both Auntie Dot and I love them.


Tuesday, October 4, 2011
Country Register Advertisement
Check out my advertisement in the local Country Register. Note that I now have mail order available and will be offering for a short time only free return shipping for my quilting services.
Double click the advertisement to see it in a larger format.

Double click the advertisement to see it in a larger format.

Friday, September 30, 2011
UFO Friday Challenge
Are you ready for a UFO Friday Challenge!......read to the end. All you have to do is participate to be eligible to receive a prize.
Well, I have been trying to inspire myself to get some of those 30 plus unfinished quilt projects done. You know the ones; those waiting to be pieced or quilted, or those projects started while taking a class and of course that fabric you just had to have that you envisioned in a beautiful quilt. I know I have them and yes we are all alike - I know you have some too.
This past week I have been working to finish a project that my daughter started several years ago. Throughout the summer I have been doing a little piecing here and there and finally got it fully pieced this past Monday. I just finished quilting it today and will be putting the binding on it this afternoon. Shhh - I am using the cheater method of binding by sewing both sides down with my domestic sewing machine. My daughter is home from university this evening and I thought it would be nice to surprise her with her new quilt.
 |
Becca's quilt top finished and waiting for quilting
|
 |
| And it's Finished!! |
All this being said I thought I would challenge you fellow quilters out there to dig into your UFO's and finish a few. Whether it's just finishing the piecing or actually getting it quilted. So here is the deal. You send me a before picture of your project (that pile of fabric or that almost finished quilt top) and then after you have finished either the piecing or quilting send me another picture. You will have until the last Friday in the month, October 29th. With every finished project I will put your name in a hat and make a draw for 4 of my hand dyed fat quarters.

And if you are in need of a quilter I am offering free return shipping for a limited time. So feel free to drop me an email or a phone call and we can discuss your quilting needs. I would be more the happy to help put the finishing touches on your quilt.
Have fun and Happy Quilting!!
Monday, September 12, 2011
Harvest Time
Well it's harvest time at the Gillespie’s. My mother came by yesterday to give me a hand and we cleaned off the nectarine tree. There are a few blemishes from the hot sun but wow are they sweet and juicy.


Our Italian Plum tree is loaded.....not sure what I am going to do with all of them. There is only so much plum pudding one can take.....
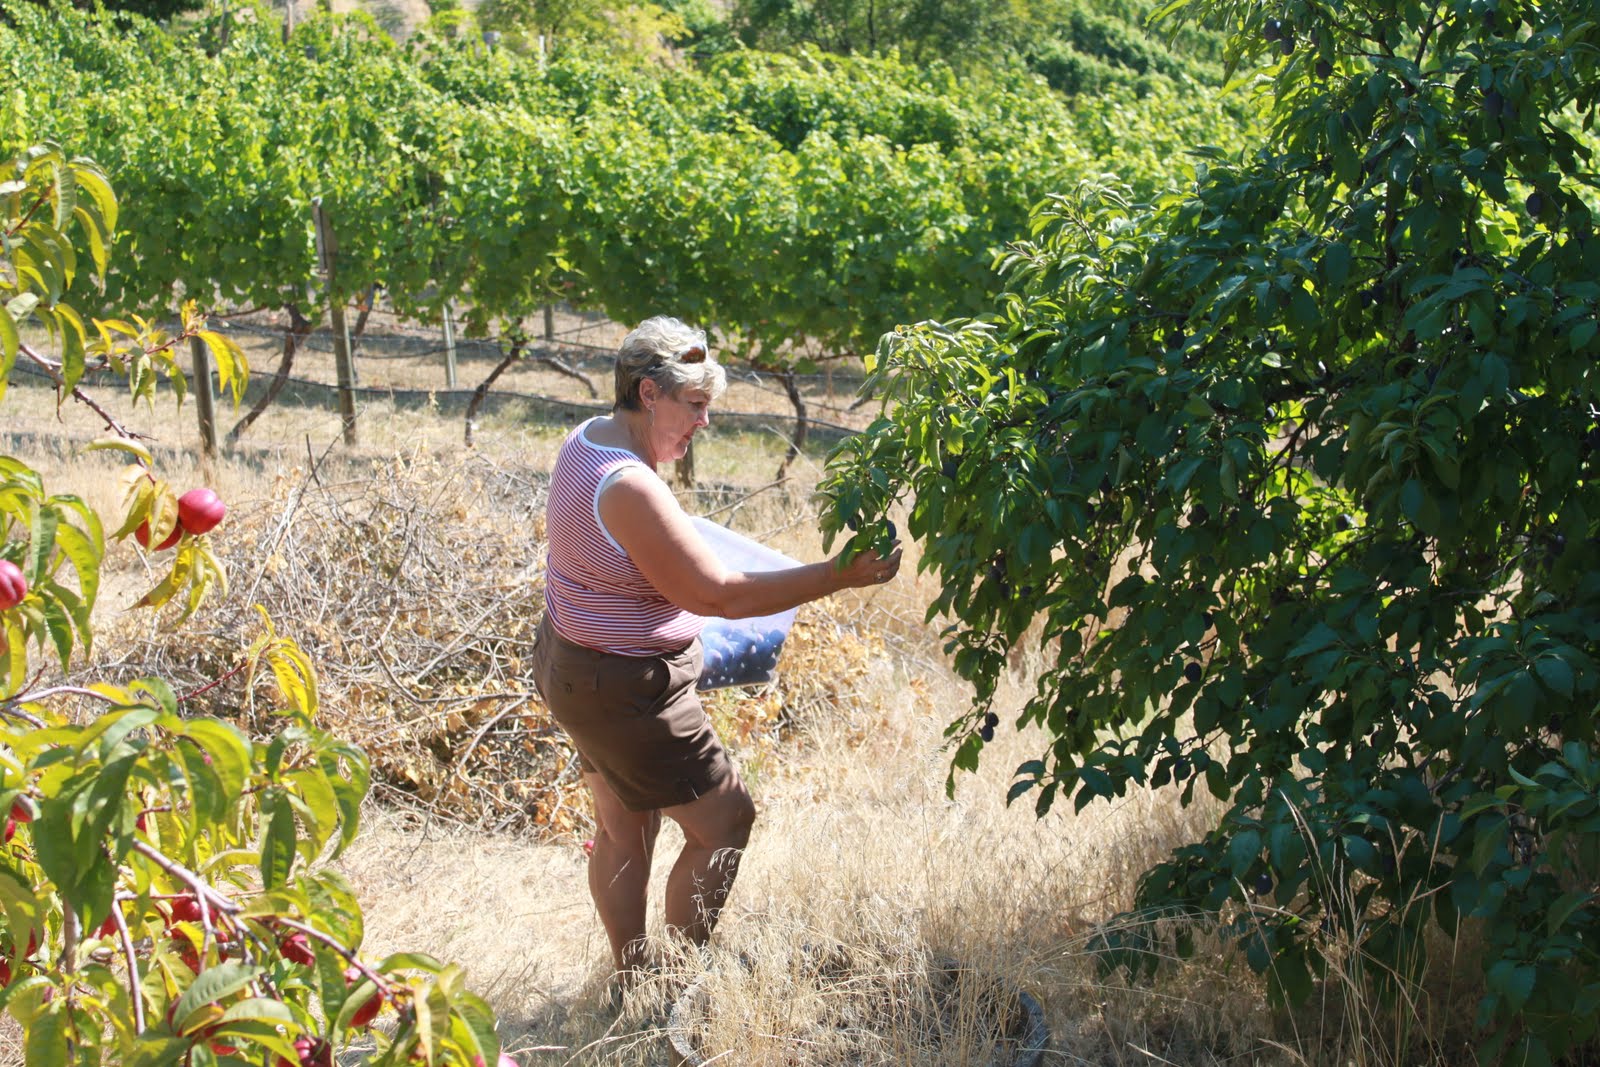 |
| My mom harvesting the plums |
 |
| Our dog Fergus enjoying the shade while we work..... |


My husband's grape crop (one very large plant) is also ready for harvesting. He is away working right now so I have been left with a strong suggestion that I should make grape jelly......hmmmmm. And to boot we went over to a friends to help pick their tomatoes and apples. Now it's can I make salsa as well? After this week of being dolly domestic I am hanging up my apron and getting back to quilting.......I can hear it calling my name!

Sunday, September 11, 2011
A Wedding and a Quilt
My niece Candace and her fellow Alex were married on September 3rd. It was a glorious day, a beautiful wedding and a fantastic party!! The wedding ceremony was held in the gardens at the Lakeside Hotel - just off the beach.

Here is their wedding quilt that I made for them. I used a free pattern off of the Moda site called Rouenneries http://www.unitednotions.com/un_main.nsf/fp_quilting. Candace's favourtie colour is purple and their wedding colours were purple and lime green. I needed a quick pattern as the wedding was fast approaching and it was the middle of August before I had a chance to start it. The modern pattern suits them and was fun to piece. The quilting pantograph pattern used was Purple Meadow......how appropriate.

Saturday, August 27, 2011
MIA - What a Summer!!!
Sorry - I have been Missing in Action from my Blog but summer has been a big whirl wind for all of my family....and it has not stopped yet.
At the end of June it was back to Ottawa with the largest suitcase available to deliver quilts to all my quilty friends and customers (check out my "Customer Quilts" page to see some of them). My mother came with me so we could see our Becca graduate from highschool. She is off to UBC - Okanagan Campus in Kelowna to take Nursing.

July 5th we packed up our truck and trailer and headed west through the northern states. It was a very long trip but fun. We loved Montana and hope to visit again. Spent a day in Yellowstone National Park and saw Old Faithful. Beautiful country.
We made it back to Summerland mid July and did a bit more unpacking of boxes.....there are still many to do....but we are getting there.
During the first two weeks of August we were off again with my sister and her husband to do some camping.....well really RVing!! No tents for this girl anymore. We spent a week fishing up at Jewel Lake (no luck) and another week down in Washington State at Twisp and Winthrop. We also managed to get a couple of games of golf in as well.
Sam and I have been busy this past week helping out a friend pick her peaches. You really know it's summer in the Okanagan when the peaches are ready to eat. They fill your hand and the sweet juice just runs down your arm. Yum. And I see a quilt in this picture......

I have also been busy making a wedding quilt for my niece Candace and her fellow Alex. The wedding is next weekend so I need to hustle.
My brother-in-law Kelly and my nephew Ian are busy building for us again. I am having my "Dye House" built this weekend. Very excited and will share pictures in a few days.
Please check out the following pages which have been updated:
Customer Quilts
Teaching Schedule and
Services and Rates
Hope your summer was as fun and jam packed as mine. Thanks for visiting and see you again much sooner.......
Friday, June 10, 2011
Fresh off the 'Rack'
Finally! I have been getting back into my quilting and working on my friend Maureen's custom quilt this past week. I just finished this morning and wanted to share some pics. Maureen will have to wait a couple of weeks until she gets it as it's travelling across Canada with me along with a few other quilts. I am heading back to Ottawa for my daughter Rebecca's highschool graduation. I can hardly wait to see Maureen's reaction and of course my daughter.
I will be in Ottawa for a week visiting my quilty friends, dropping off a bundle of quilts and picking up my family and heading west......again. This time we will be travelling in our travel trailer winding our way west and visting a few quilt shops along the way. My daughter wants to go to Bozeman Montana - apparently Sheldon from Big Bang Theory went there and so should she.....I am all for it as I found out that there is a quilt shop in Bozeman!!
Enjoy the pictures.
 |
| Actually in this picture and the following she's still on the rack. |

 |
| Here it is laying in the sunshine pouring through my studio window |

 |
| View from the back |
Friday, June 3, 2011
Tour my New Studio
Well it's been a busy month settling in to our new home. There is still much to do but my studio has finally come together and I wanted to share it with you.
In all the chaos I have managed to get a few pantographs done and I am anxious to get at my customers custom quilts.I must say I am very blessed to have such wonderful family and friends who have helped to make my new studio beautiful, warm and inviting.
Enjoy the tour.


Monday, May 23, 2011
Around our garden
I had a visitor stop by this morning on my deck. There is an abundance of quail in the Summerland area and their babies should be arriving soon.

All my pots are planted with the help of my niece Candace. Once the trees fill in it will be a nice place to sit and enjoy the warm summer evenings.

The rhododendrum is in full bloom and if you look closely you will see a robin having a bath in the pond.


It is very enjoyable exploring our new garden. Every day there is something new to see. Here are a few more pictures from around our garden....
 |
Apple Blossoms  |

Subscribe to:
Posts (Atom)