Sunday, March 25, 2012

And the Winner is ...

Thanks to everyone  who visited my site over the past week as part of the Quilting Gallery Quilters Blog Hop and welcome to all my new Blog followers.  It was wonderful hearing all of your kind remarks.

The winner of the random draw is Debra Lee (SD4219).  Congratulations! I will be contacting you shortly by email to get your contact information.

Winner's Choice - SD4219

Over the last week I received over 180 comments about my Snow Dyed fabrics.  Of these, by a wide margin, the three most popular fabrics were:

SD4223 - 24 Votes

SD4217 -  19 Votes

SD4216 - 13 Votes
I am thrilled about the success of the Blog-Hop. I hope everyone enjoyed it as much as I.  If you didn't win and are still interested in owning one of these fabrics, they are available for sale online at my web site.

Friday, March 16, 2012

Quilter’s Blog Hop Party with Give-Aways

Celebrate St. Patrick’s Day - It’s time for a Blog Hop Party! 

st-patricks dayBlog Hop Party
This year I am joining in the fun from the Quilting Gallery Quilter’s Blog Hop Party. 
As part of the Blog Hop, I will be giving away a metre of my custom, snow-dyed fabric to one lucky winner.

How do you participate?  Simply follow this link to the Snow Dyed fabrics on my web site, pick your favourite piece, then return to my blog and leave a comment identifying your choice.  When posting your comment, please sign your name and use your `Member` id or include your email address so I can get back to you!

Then, go to the Quilting Gallery to find more participating blogs and more give-aways!

Blog hopping will start March 17th and last until March 23rd.  I will announce the winner in a post on the 24th chosen by a random draw from all the comments on my blog.

Happy St. Paddy`s Day and Happy Blog Hopping and may the luck of the Irish be with you!!

Thursday, March 15, 2012

Spring Quilt Shows

Its been so hectic around here lately - and exciting!  I have booked booths at two BC Quilt shows in May.  The Victoria Quilters Guild show in Victoria May 4th, 5th and 6th followed by the Langley Quilt Show May 11th and 12th.  I'll be featuring my Fil-Tech Glide quilting and embroidery thread and bobbins, as well as my own hand-dyed fabrics. 

The hectic part?  I want to produce 250 metres of hand dyed fabric before the shows!  So far I have finished 25m of snow dyes, and another 50m of various styles from single to multi coloured batches. 


Today my friend Marilyn is coming over again to help with 30m of 9-step, 2 colour progressions.  I am happy so far with the results, even if it has taken over the basement/kitchen and other areas of our home.  Its been so windy around here lately that I have even had to hang the fabrics to dry inside to keep them from blowing away.


 Oh well, its only for another few weeks!  I will be moving my fabric dyeing operations out to my new Dye House as soon as we can turn on the outside water.


Monday, March 5, 2012

Mystery Quilt Monday - Clue #6

Good Morning Everyone!! 
Here is the last clue to our mystery quilt.  It's been lots of fun doing this for you and I hope you love the results as much as I do.
It's time to put all those beautiful squares together....

Your Frayed Sawtooth Star and Sarah's Choice blocks should measure 10 1/2" square.  Sometimes mine end up a wee bit smaller.  I tend to piece tighter.  That's OK - as long as they are the same size.  So square up those blocks.
Next lay them out as shown below in Fig. 1.
Fig 1.

You will be sewing these together in rows. The blocks should link together at the seams - if not then you may have to rotate Sarah's Choice block one turn.  Keep in mind that the colours on the Frayed Sawtooth Star and all going in the same direction.
Once the rows are pieced you will then sew the rows together.  Make sure you press each row in the opposite direction and then they will all link together.
The centre of the quilt will measure 50 1/2" square.  Yours may be smaller or bigger depending on your squared up block size.  Going forward my instructions will be based on the actual size of the quilt as per a 10 1/2" block.

First border - with colour #3 cut 6 - 2" strips the width of the fabric.  Two of these strips will be cut in half.  Sew one strip plus the half strip together to make an approx. 60" long strip.  Cut two of the strips exactly the length of your quilt - 50 1/2".  Pin to opposite sides and sew down.  Press to the outer edge of the quilt.  Next re-measure.  cut the two remaining strips 53 1/2" long, pin to the opposite sides, sew, press to the outside.

Fig. 3


Second border - with colour #1 cut 4 - 6" strips the length of the fabric.  Cut two of the strips exactly the length of your quilt - 53 1/2". Pin to opposite sides and sew down. Press to the outer edge of the quilt. Next re-measure. cut the two remaining strips 65" long, pin to the opposite sides, sew, press to the outside.


 Congratulations!!

Please send me your pictures of your finished quilts.  I would love to post them on my blog.

Happy Quilting,

Barb

Monday, February 6, 2012

Mystery Quilt Monday- Clue #5

Happy Monday Morning,

Hard to believe we are already in February.  There has been lots and lots happening here in my studio that I will be sharing with you shortly.  For now I know you are all waiting on the next clue......we are almost there and then the mystery will be

Please note that there was an error last month (just numbering the units.....don't panic).  Clue #4 - Unit 4 should read Unit 5 and Unit 5 should read Unit 6.  Sorry for the confusion.

Unit #7
You will need to cut the following:
Cut - 2 WOF (width of fabric) 3" strip of Fabric #2
Cut - 1 WOF 1 ¾” strip of Fabric #5
Cut - 1 WOF 1 ¾”strip of Fabric #6

Sew the strip set together with one Fabric #2 strip in the middle of Fabrics #5 & #6.  Press towards Fabric #2.  Sub-cut this strip set into 1 ¾” units (Unit #7). You will need 24 of these.  Sub-cut the 2nd 3" strip of Fabric #2 into 1 ¾” x 3" rectangles.  You will need 24 of these as well.
Fig. 1

This is the centre of our block.  Take Unit #1 and sew a 1 ¾” x 3" rectangle to each side. Press to towards Fabric #2.  Next sew a Unit #7 to the top and bottom.  Press towards the pieces you just added.  You will need 12 of these centre blocks.  Please note that Fabrics #5 & #6 will need to travel in a diagional line through the block.  I find it easier if I lay out my blocks beside my sewing machine in the order that they will be sewn - ensuring that I am keeping them going in the correct directions. see Fig.1

It's now time to put the block together.  This block is called "Frayed Sawtooth Star".  You will make 12 of these blocks measuring 10 1/2" unfinished.

Fig. 2
Fig. 3

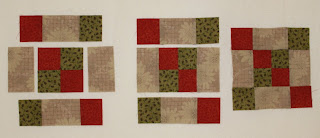
Layout all your units as per Fig. 2  You will need Units #2, #3 and #4.  Sew them together like a nine patch.  I sewed the centre square and Units #4 to each side, pressing to Unit #4.  Then sew Units #2 & #3 to each side of a unit #4 pressing towards the four patches.  Again make sure you lay them out with the diagional squares running through the block.

The next block is called "Sarah's Choice".

Cut 52 - 3" squares of Fabric #2

I would suggest you lay out the block beside your sewing machine.  This way you will make sure you have all the sections going in the right direction.
You will need the 3" squares for the corners; Unit #5 (flying geese); Unit #6 (half-square triangles) for the centre.

Fig. 4
First complete the inside square (just like a 4 patch) with the half square triangles.  They will all interlock because you pressed them all to the same side.  With the last seam through the middle I pressed the seam open.  See Fig. 5
Fig. 5
Once the centres are completed.  Sew together the block just like a nine patch.  I sewed each row and then sewed the rows together.  The centre row with the half square triangles - I pressed to the towards the flying geese units. Again with the top and bottom row I pressed towards the flying geese units.  I found that this way was the least bulky in the seams.  If you wish you could press each seam open and that would help reduce the bulk.  I always use a bit of steam at the end to give it that last hard press to lay nice and flat.....be careful though....press not iron.
Fig. 6
You will make 13 of these blocks measuring 10 1/2" unfinished.

Happy Piecing!


Sunday, January 1, 2012

Mystery Monday - Clue #4

Good Monday morning.  Here is Clue #4 that you all have been waiting for.  Guess what....more flying geese!!  And a few half square triangles too.

Unit 4 - Make 52 Flying Geese units using Fabric #7 and Fabric #8 along with Fabric #2.

You will need to cut the following:

52 - 5 ½” x 3” rectangles from Fabric #2
52 - 3" x 3" squares from Fabric #7
52 - 3" x 3" squares from Fabric #8
To make the flying geese units you will draw a line (on the wrong side of the fabric) corner to corner on the 3" squares (Fabric #7 & Fabric 8) - this is your sew line (Fig. 1).
Fig. 1

Place the square on one side of the 5 ½” x 3” rectangle (right sides together)  - lining up all the edges. Sew on the line. I like to sew on the line from the outside corner down to the middle of the 5 ½” x 3” rectangle. Sewing this way helps when you want to do a strip sewing method (continuous sewing of all the units).  Note:  all of the Fabric #7 squares need to be sewn to the same side in the same direction for each 5 ½” x 3" rectangle.  Likewise when you sew the #8 - 3" squares to the opposite side - make sure you are sewing them all on the same side.

Lay your ruler's ¼” line onto your sew line. Trim away the excess. Press Fabric #7 away to the outside corner as shown in Fig. 2
Fig. 2

Place Fabric #8 - 3" square on the opposite side of the 5 ½” x 3” rectangle (right sides together) - lining up all the edges. Sew on the line. Again - I like to sew from the outside corner into the middle. This way when you come to the previous seam you are traveling in the right direction and you won't have your previous seam turning in the wrong direction and your unit will lay flat. Lay your ruler's ¼” line onto your sew line. Trim away the excess. Press Fabric #8 away to the outside corner as shown in Fig. 3. Note: each point will be a different fabric.  All flying geese should be completed the same.
Fig. 3

Unit #5 - make 52 half square triangle units. If you have the "Quilt in a Day" half square triangle ruler just follow her directions for the 3" unfinished or the 2 ½” finished half square triangles.  I just love using this ruler.  You get 8 - half square triangles for each 7" square of the two fabrics.  Done in a jiffy!!  You will be using Fabrics #7 & #8 for these units.
If you don't have the ruler - it's the old fashioned way for you......
You will need to cut the following:
26 - 3 ½” squares of Fabric #7
26 - 3 ½” squares of Fabric #8
To make the half square triangle units you will draw a line (on the wrong side of the fabric) corner to corner on the 3 ½” squares (Fabric #7) - this is your reference line (Fig. 4).  Place Fabric #7 over Fabric #8 right sides together.  Sew 1/4" from the reference line on both sides.  Cut on the reference line.  Press the two units open.  Square up to 3" (Fig. 5).  
Fig. 4
Fig. 5
Note: when calculating the cutting size of the half square triangles the rule of thumb is the finished size of the block 2 ½” plus 7/8” equals 3 3/8” squares.  I like to round up the extra 8th of an inch to 3 ½”.  It gives me that extra bit more to square up my blocks - because you know when you sew on a bias things can get a bit wonky.
Happy piecing.


Saturday, December 31, 2011

Happy New Year!!!

I would like to take this opportunity to wish everyone a very Happy New Year and thank all of you who have made 2011 one to remember.  There have been many ups and downs this year but my quilting family have been there to encourage and console.  Thank you for looking out for me, I could not have made it without all of you.

Looking forward to 2012 there are many new things coming my way.  I have a full teaching schedule coming up this winter season.  I also have some special projects I have been working on and will share with all of you as they are completed.

I have a new website in the making and I am very excited on how it is going......you can check on my progress and hopefully in the next two weeks it will be all up and running.  www.cherrytreequilts.ca

One on the things I am most excited about is that I have become a Canadian distributor for the best thread on the market.  Fil-tec Threads.  The Glide thread is just amazing and when you pair it with the pre-wound bobbins you get the best tension you could ever have.  More to follow on this.........

Again I would like to wish you all a Happy New Year!!  May your year be filled with much joy, happiness and prosperity.

Barb