Hard to believe we are already in February. There has been lots and lots happening here in my studio that I will be sharing with you shortly. For now I know you are all waiting on the next clue......we are almost there and then the mystery will be
Please note that there was an error last month (just numbering the units.....don't panic). Clue #4 - Unit 4 should read Unit 5 and Unit 5 should read Unit 6. Sorry for the confusion.
Unit #7
You will need to cut the following:
Cut - 2 WOF (width of fabric) 3" strip of Fabric #2
Cut - 1 WOF 1 ¾” strip of Fabric #5
Cut - 1 WOF 1 ¾”strip of Fabric #6
Sew the strip set together with one Fabric #2 strip in the middle of Fabrics #5 & #6. Press towards Fabric #2. Sub-cut this strip set into 1 ¾” units (Unit #7). You will need 24 of these. Sub-cut the 2nd 3" strip of Fabric #2 into 1 ¾” x 3" rectangles. You will need 24 of these as well.
It's now time to put the block together. This block is called "Frayed Sawtooth Star". You will make 12 of these blocks measuring 10 1/2" unfinished.
Layout all your units as per Fig. 2 You will need Units #2, #3 and #4. Sew them together like a nine patch. I sewed the centre square and Units #4 to each side, pressing to Unit #4. Then sew Units #2 & #3 to each side of a unit #4 pressing towards the four patches. Again make sure you lay them out with the diagional squares running through the block.
The next block is called "Sarah's Choice".
Cut 52 - 3" squares of Fabric #2
I would suggest you lay out the block beside your sewing machine. This way you will make sure you have all the sections going in the right direction.
You will need the 3" squares for the corners; Unit #5 (flying geese); Unit #6 (half-square triangles) for the centre.
First complete the inside square (just like a 4 patch) with the half square triangles. They will all interlock because you pressed them all to the same side. With the last seam through the middle I pressed the seam open. See Fig. 5
Once the centres are completed. Sew together the block just like a nine patch. I sewed each row and then sewed the rows together. The centre row with the half square triangles - I pressed to the towards the flying geese units. Again with the top and bottom row I pressed towards the flying geese units. I found that this way was the least bulky in the seams. If you wish you could press each seam open and that would help reduce the bulk. I always use a bit of steam at the end to give it that last hard press to lay nice and flat.....be careful though....press not iron.
You will make 13 of these blocks measuring 10 1/2" unfinished.
Happy Piecing!
Sew the strip set together with one Fabric #2 strip in the middle of Fabrics #5 & #6. Press towards Fabric #2. Sub-cut this strip set into 1 ¾” units (Unit #7). You will need 24 of these. Sub-cut the 2nd 3" strip of Fabric #2 into 1 ¾” x 3" rectangles. You will need 24 of these as well.
 |
| Fig. 1 |
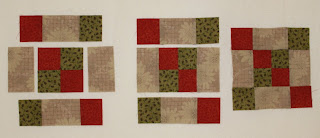
This is the centre of our block. Take Unit #1 and sew a 1 ¾” x 3" rectangle to each side. Press to towards Fabric #2. Next sew a Unit #7 to the top and bottom. Press towards the pieces you just added. You will need 12 of these centre blocks. Please note that Fabrics #5 & #6 will need to travel in a diagional line through the block. I find it easier if I lay out my blocks beside my sewing machine in the order that they will be sewn - ensuring that I am keeping them going in the correct directions. see Fig.1
It's now time to put the block together. This block is called "Frayed Sawtooth Star". You will make 12 of these blocks measuring 10 1/2" unfinished.
 |
| Fig. 2 |
 |
| Fig. 3 |
Layout all your units as per Fig. 2 You will need Units #2, #3 and #4. Sew them together like a nine patch. I sewed the centre square and Units #4 to each side, pressing to Unit #4. Then sew Units #2 & #3 to each side of a unit #4 pressing towards the four patches. Again make sure you lay them out with the diagional squares running through the block.
The next block is called "Sarah's Choice".
Cut 52 - 3" squares of Fabric #2
I would suggest you lay out the block beside your sewing machine. This way you will make sure you have all the sections going in the right direction.
You will need the 3" squares for the corners; Unit #5 (flying geese); Unit #6 (half-square triangles) for the centre.
 |
| Fig. 4 |
 |
| Fig. 5 |
 |
| Fig. 6 |
Happy Piecing!
